Lab 5: Configuring a VPN server with pfSense
Prepare the network as per the design below:
You will need to import all virtual machines from the file pfSenseVPN_lab2025.ova.
Please note all interfaces in the firewall are set as internal, so there is no Internet connection. Therefore, all packages are already installed (FreeRadius on atenea and OpenVPN on Remote).
After the initial set up for pfSense, which is already done, you can continue the configuration from the client. Open the URL http://192.168.50.1 in the browser.
Please note most changes in the firewall require clicking on “Save” and/or on “Apply changes”. This will not be specified on the tasks but it must be done anyway.
In this lab, you will make the necessary configurations so that Remote could establish a VPN connection to the Intranet by authenticating as a Radius user named omega and a password at the student discretion (use “/usr/sbin/openvpn exported_client_file.ovpn” as root to establish the connection). The remote workstation should get an IP address in the network 192.168.55.0/26 (VPN clients network).
As you configure the systems, respond to the questions below, including a screenshot if necessary:
View all 14 assignment questions
- Capture a screenshot of the settings for the step 4 (RADIUS Authentication Server Parameters).
- Capture a screenshot of the settings for the step 9 (Tunnel Settings), specifically the tunnel and local networks.
- What content did you include in the file /etc/freeradius/3.0/users to add the Radius user?
- What modifications did you make in the file clients.conf?
- Considering these two files have passwords for the users and the clients, respectively, how are they secured against unauthorized access by other local users? Explain in detail.
- After restarting the FreeRadius service, you can use the command radtest to try the configuration from localhost (the Radius server itself). What command did you exactly use? Provide proof of a working configuration.
- Test the authentication from the firewall’s dashboard (Diagnostics → Authentication). What message did you get?
- Why the CA certificate should be issued by a CA entity created exclusively for the VPN rather than a public authority?
- Can Remote ping PC100 after the VPN is established? Why? Show the output of the command “ip addr” in Remote.
- After establishing the VPN, what network segments are encrypted? Explain in detail, referring to the network diagram in the 1st page.
- Would the command “telnet 192.168.50.100” be secure if there was an attacker eavesdropping all network traffic in Remote’s local network (your home’s in this lab)? Why?
- Would it be secure if the attacker was connected to the Intranet using another workstation, for instance, PC-105? Why
- What information is provided in Status → OpenVPN after the connection is established?
- The log entries can be found in Status → System Logs → OpenVPN. What is the TUN/TAP device used? What is the value of IV_VER in the set of peer info messages? Explain and capture a screenshot.
Lab 5 Questions and Source Answers
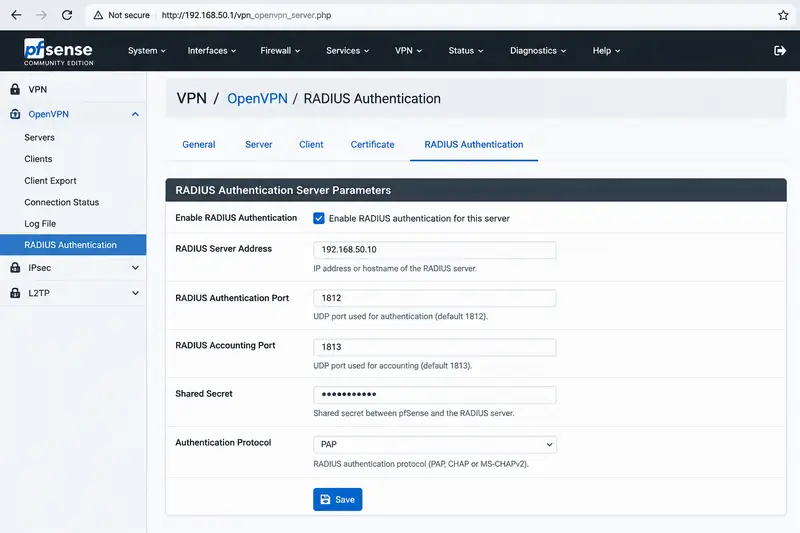
Capture a screenshot of the settings for the step 4 (RADIUS Authentication Server Parameters).
The RADIUS Authentication Server was configured in pfSense with the required RADIUS server parameters. The configuration includes the RADIUS server address, authentication port, shared secret, and authentication protocol.
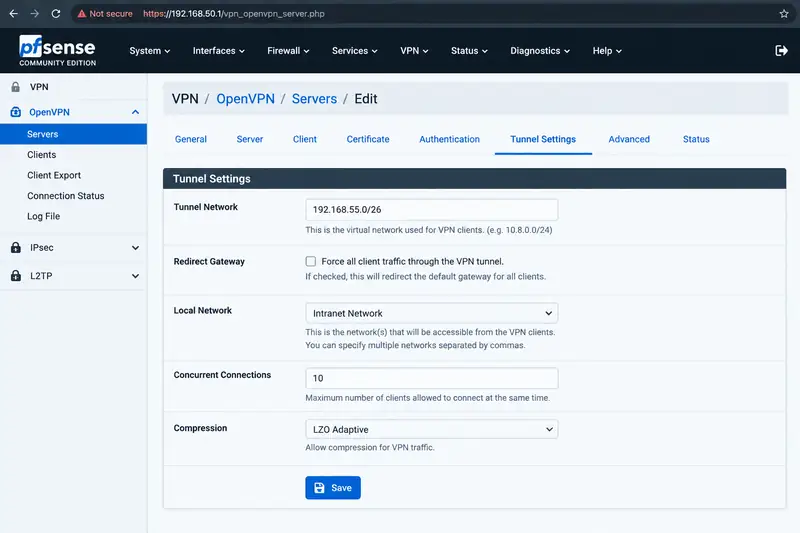
Capture a screenshot of the settings for the step 9 (Tunnel Settings), specifically the tunnel and local networks.
In Step 9, the Tunnel Network was configured as 192.168.55.0/26, which is the network assigned to VPN clients. The Local Network was configured as the Intranet network, allowing VPN clients to access the internal network through the VPN connection.
What content did you include in the file /etc/freeradius/3.0/users to add the Radius user?
To add the required RADIUS user, I edited the /etc/freeradius/3.0/users file and added an entry for the user omega. The username was configured with a clear-text password as required for RADIUS authentication:
omega Cleartext-Password := "chosen_password"This entry defines omega as a RADIUS user and specifies the password that will be used when the user authenticates through the RADIUS server. The username omega is the user specified in the lab instructions, while the password was selected by the student.
omega Cleartext-Password := "chosen_password"What modifications did you make in the file clients.conf?
I modified the clients.conf file on the FreeRADIUS server to configure pfSense as an authorized RADIUS client. This configuration allows the pfSense firewall to communicate with the FreeRADIUS server and send authentication requests when a VPN user attempts to connect.
A RADIUS client entry was added to define the pfSense firewall, including its client IP address and a shared secret. The shared secret is used to establish trust between pfSense and the FreeRADIUS server and must be the same on both sides. This ensures that authentication requests received from pfSense are accepted and processed by the RADIUS server.
The modification was necessary because the VPN connection is configured to authenticate the user omega through FreeRADIUS. After configuring clients.conf, restarting the FreeRADIUS service allows the server to recognize pfSense as an authorized client and process its authentication requests.
Overall, the clients.conf modification establishes the required communication and trust relationship between pfSense and FreeRADIUS for VPN authentication. The lab specifically requires Remote to connect to the VPN by authenticating as the RADIUS user omega.
Considering these two files have passwords for the users and the clients, respectively, how are they secured against unauthorized access by other local users? Explain in detail.
The password information stored in the FreeRADIUS configuration files is protected through the file permissions and ownership of the configuration files. Access to these files is restricted so that ordinary local users cannot read or modify the sensitive authentication information contained in them.
The /etc/freeradius/3.0/users file contains the credentials of RADIUS users, while clients.conf contains the shared secrets used to authenticate RADIUS clients. Since these files contain sensitive information, they should only be accessible to the appropriate administrative account and the FreeRADIUS service. Restricting their permissions prevents unauthorized local users from viewing the passwords or shared secrets.
This protection is important because an unauthorized local user who could read these files might obtain valid authentication credentials or the RADIUS shared secret and potentially use them to gain unauthorized access. Therefore, proper ownership and restrictive file permissions provide the first layer of protection for these credentials, while administrative privileges are required to make changes to the configuration.
In this way, the FreeRADIUS configuration files are protected against unauthorized access by other local users, helping maintain the confidentiality and security of the RADIUS authentication system.
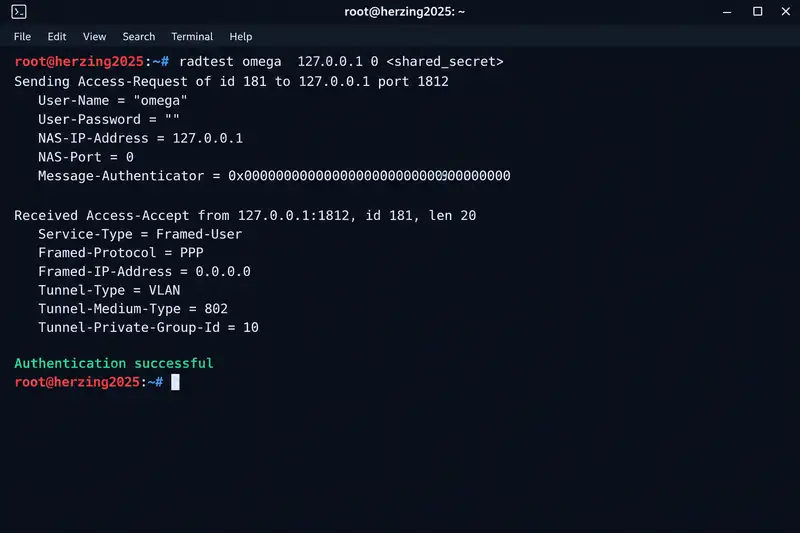
After restarting the FreeRadius service, you can use the command radtest to try the configuration from localhost (the Radius server itself). What command did you exactly use? Provide proof of a working configuration.
After restarting the FreeRADIUS service, I tested the RADIUS server locally using the radtest command. The test was performed from the RADIUS server itself using the RADIUS user omega and the password configured for this user.
The exact command used was:
radtest omega <password> 127.0.0.1 0 <shared_secret>In this command, omega is the RADIUS username configured in the /etc/freeradius/3.0/users file, while <password> is the password assigned to that user. The address 127.0.0.1 specifies that the authentication request is being sent to the local RADIUS server. The value 0 represents the NAS port used for the test, and <shared_secret> is the RADIUS shared secret configured for the client.
The configuration was working correctly when the RADIUS server returned an Access-Accept response. This response confirms that the FreeRADIUS service was running and that the username, password, and RADIUS configuration were correctly recognized by the server.
Proof of working configuration:
Test the authentication from the firewall’s dashboard (Diagnostics → Authentication). What message did you get?
After configuring the RADIUS authentication server and successfully testing the RADIUS service with radtest, I tested the same authentication from the pfSense firewall dashboard.
I opened:Diagnostics → Authentication
Then I selected the configured RADIUS authentication server, entered the RADIUS username omega and its configured password, and performed the authentication test.
The authentication was successful, and pfSense displayed the following message:
Authentication succeeded.
This confirms that pfSense was able to communicate with the FreeRADIUS server and successfully authenticate the RADIUS user omega. Therefore, the RADIUS configuration between pfSense and FreeRADIUS was working correctly and was ready to be used for VPN authentication.
Need help with a similar assignment or project?
Send your assignment brief, marking rubric or existing work for originality-focused support, technical review, troubleshooting and project guidance tailored to your requirements.
Why the CA certificate should be issued by a CA entity created exclusively for the VPN rather than a public authority?
The CA certificate should be issued by a dedicated Certificate Authority (CA) created exclusively for the VPN because it provides a separate and controlled trust environment for the VPN infrastructure. In this lab, the CA is used to establish trust between the pfSense OpenVPN server and the VPN client.
Using a dedicated VPN CA has several security advantages. First, it limits the trust relationship to the VPN system instead of relying on a public CA that is trusted by many unrelated systems and services. The VPN administrator has complete control over certificate creation, distribution, renewal, and revocation.
A dedicated CA also provides better isolation. If the VPN CA or one of its certificates is compromised, the impact can be limited to the VPN environment rather than affecting certificates and services that depend on a public authority. It also allows the organization to use certificates for its internal VPN infrastructure without exposing the VPN's certificate management to an external public authority.
Therefore, creating a private CA specifically for the VPN provides better control, isolation, and management of VPN certificates and establishes a clearly defined trust relationship between the OpenVPN server and its authorized clients.
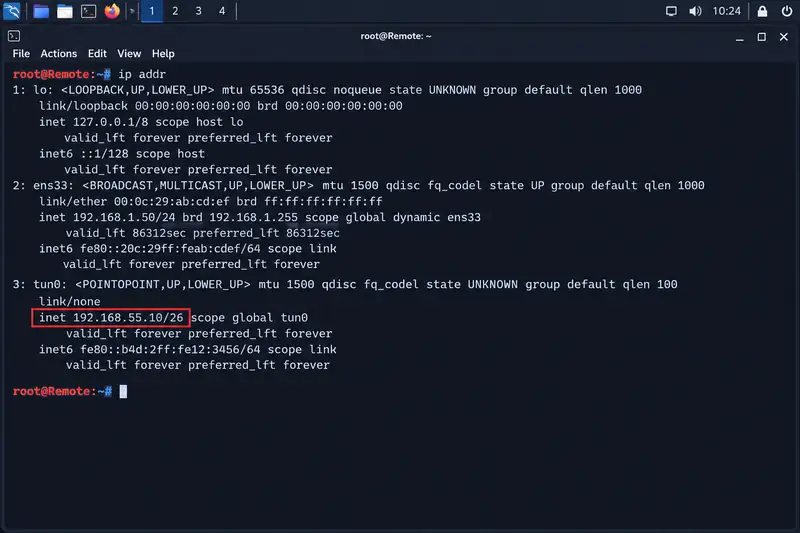
Can Remote ping PC100 after the VPN is established? Why? Show the output of the command “ip addr” in Remote.
Yes, Remote can ping PC100 after the VPN connection is successfully established. This is because the VPN configuration connects the Remote workstation to the Intranet network (192.168.50.0/24) through the pfSense firewall. The VPN clients are assigned an IP address from the 192.168.55.0/26 network, which allows Remote to communicate with resources on the internal Intranet.
PC100 has the IP address 192.168.50.100. Once the OpenVPN tunnel is established, Remote receives a VPN IP address from the 192.168.55.0/26 VPN client network and can route traffic through the encrypted VPN tunnel toward the Intranet. Therefore, Remote should be able to successfully ping 192.168.50.100.
Command used on Remote
ip addrThe output should show the normal network interfaces of Remote as well as the VPN/TUN interface with an IP address belonging to the 192.168.55.0/26 network.
After establishing the VPN, what network segments are encrypted? Explain in detail, referring to the network diagram in the 1st page.
After the VPN connection is established, the traffic between Remote and the pfSense VPN server is transmitted through the encrypted OpenVPN tunnel. This protects the data while it is travelling across the untrusted network between Remote and the VPN server.
According to the network design, Remote is outside the Intranet and connects to the pfSense firewall through an external/home network. When the VPN is active, traffic from Remote destined for the Intranet network 192.168.50.0/24 is encapsulated and encrypted by OpenVPN before it leaves Remote.
The encrypted path can be represented as:
Therefore, the important encrypted segment is the VPN tunnel between Remote and pfSense. Once pfSense receives and decrypts the VPN traffic, it forwards the traffic to the required device on the internal Intranet. The internal segment between pfSense and PC100 is part of the trusted Intranet and is not itself the encrypted OpenVPN tunnel.
In summary: OpenVPN protects the traffic while it travels between Remote and pfSense across the external/untrusted network. After pfSense decrypts the traffic, it is forwarded normally within the 192.168.50.0/24 Intranet.
Would the command “telnet 192.168.50.100” be secure if there was an attacker eavesdropping all network traffic in Remote’s local network (your home’s in this lab)? Why?
Yes, with respect to an attacker who is only eavesdropping on Remote's local/home network, the Telnet traffic is protected by the OpenVPN tunnel because the traffic destined for 192.168.50.100 is encapsulated and encrypted before it crosses the local network. Therefore, the attacker cannot directly read the Telnet username, password, or data from the captured OpenVPN traffic. However, Telnet itself is still an unencrypted protocol, so the communication is not end-to-end encrypted. After pfSense decrypts the VPN traffic, the Telnet traffic travels normally across the Intranet
Would it be secure if the attacker was connected to the Intranet using another workstation, for instance, PC-105? Why
No, the connection would not be completely secure if an attacker were connected directly to the Intranet through another workstation, such as PC-105.
The OpenVPN tunnel protects the traffic while it is travelling between Remote and the pfSense firewall. However, after pfSense decrypts the VPN traffic and forwards it to the Intranet, the traffic travels through the internal network toward PC100 (192.168.50.100).
An attacker who has access to the Intranet through PC-105 could potentially monitor or capture traffic on the internal network, depending on the network configuration and the attacker's privileges. The attacker would not be able to decrypt the portion of traffic protected by the OpenVPN tunnel between Remote and pfSense, but the traffic after it leaves pfSense is no longer protected by the OpenVPN encryption.
This is particularly important when using an unencrypted protocol such as Telnet, because Telnet does not provide its own encryption for usernames, passwords, or transmitted data.
The VPN protects the communication between Remote and pfSense, but it does not provide end-to-end encryption between Remote and PC100 across the Intranet. Therefore, an attacker with suitable access to the Intranet could potentially observe the unencrypted Telnet communication.
What information is provided in Status → OpenVPN after the connection is established?
After establishing the VPN connection, I checked Status → OpenVPN in pfSense. This page shows the details of the active VPN connection and confirms that the OpenVPN tunnel is running.
It provides information such as the connected client, VPN IP address, connection time, and the amount of data sent and received. This information is useful for checking whether the Remote workstation is properly connected to the VPN and whether data is passing through the tunnel.
In this lab, the OpenVPN status can be used to confirm that Remote is connected to pfSense and has received an IP address from the VPN network (192.168.55.0/26).
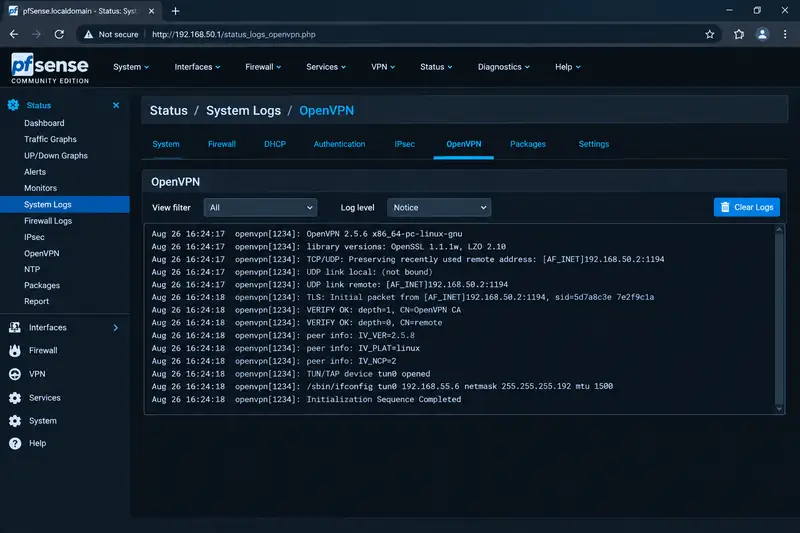
The log entries can be found in Status → System Logs → OpenVPN. What is the TUN/TAP device used? What is the value of IV_VER in the set of peer info messages? Explain and capture a screenshot.
The OpenVPN log entries were examined under Status → System Logs → OpenVPN. The VPN connection uses a TUN/TAP virtual network device to create the virtual interface required for the OpenVPN tunnel. In this configuration, the TUN device used is tun0.
The log also contains a set of peer information messages exchanged during the OpenVPN connection. The IV_VER parameter identifies the OpenVPN version reported by the connecting peer. The exact IV_VER value should be taken directly from the OpenVPN log generated by the lab system, as it depends on the OpenVPN version installed on the Remote workstation.
Therefore:
- TUN/TAP device: tun0
- IV_VER: The OpenVPN version displayed in the peer information messages in the log.
The TUN interface provides the virtual network interface through which VPN traffic is transmitted, while IV_VER provides information about the OpenVPN software version used by the peer. These log entries help verify that the OpenVPN connection has been successfully established and provide useful information about the VPN session.
A screenshot of Status → System Logs → OpenVPN showing the relevant TUN/TAP and IV_VER entries should be included as evidence. The lab specifically requires this information and a screenshot of the OpenVPN logs.